I love making Taco Soup for dinner. Especially on a cold day! Well a few weeks ago it was late and neither my husband or I felt like running to the store to buy taco seasoning so I googled how to make my own. I love this almost better than the package you buy in the store!!
Homemade Taco Seasoning --
2 tsp chili powder
1 1/2 tsp salt
1 tsp garlic powder
1 tsp corn starch
1 tsp cumin
1/2 - 1 tsp cayenne pepper (depending on how spicey you like it)
Mix together and add to you dish.
Enjoy!!
Showing posts with label Baking/Cooking Tips. Show all posts
Showing posts with label Baking/Cooking Tips. Show all posts
Saturday, March 26, 2011
Homemade Taco Seasoning
Saturday, January 22, 2011
{THE Perfect White & Chocolate Frostings}

I make this same white frosting for my Red Velvet Cake/Cupcakes but can you believe that I have NEVER thought about putting it on regular cupcakes - and it's my FAVORITE!! So I was excited when I read that someone else thinks it's the best too. She has pictures I posted to help when making it. Also here is a chocolate version that sounds VERY yummy too...
Perfect Cupcake Frosting and Filling -3 T Flour1/2 C milk (whole milk is best, but I used non-fat when it's all I have and it's actually fine)1/2 C real butter1/2 C sugar (that's granulated sugar, not powdered sugar)1 t vanilla extract, or other flavor if you wish.
Whisk together the flour and the milk. Heat in a small sauce pan on medium he Whisk continuously until it starts to thicken. Let it cook, while stirring, until you can start to see the bottom of the pan. It should still be liquid-ish though, like this:
 It's okay if you have lumps, because we're gonna strain those out right now. Place the mixture in a mesh strainer and stir with a rubber spatula to push it through.
You should end up with a nice, smooth mixture. It's almost like pudding before it's set.

Put this mixture in the fridge and let it cool completely, it's fine if it stays in there long enough to get chilly, you just don't want it warm at all. When it is chilled, you can move on to the following step.
It an electric stand mixer, beat the butter and the sugar for a minute or two until well combined and fluffy. You'll want to use the whisk attachment on a stand mixer, not the flat paddle. Then while beating, add in the thickened milk mixture and the vanilla. Beat to combine and then scrape down the sides. Don't be scared. It's going to look like a goopy mess and kind of lumpy and separated like this:

But you just wait. It's gonna blow your mind in a few minutes. Beat on med-high for 7-8 minutes. Yes, that long. I know it seems like forever, but that's when the magic happens!
After 7-8 minutes it will have transformed from that sloppy mess into something gorgeous, fluffy, and incredibly light and silky.
 Use it to fill or frost cupcakes, cakes or other pastries. You can't go wrong putting this on just about anything :)
Frosts 12 cupcakes
Weight Watchers Points: 1 point per tablespoon of frosting
Here are some helpful Notes:
1. Use real butter, and a good name-brand. Cheap butter does weird things.
2. If you beat for the 6-8 minutes and the mixture still looks strange, beat longer and at a higher speed if you can. It should come together, but it takes a little patience!
3. Store at room temperature. Frosting may separate in the fridge, but you can store it overnight if left at room temp and in a well sealed container.
4. Add extracts to your hearts content; lemon is wonderful! Food coloring is also okay.
5. The white sugar can be exchanged for brown. Try 1/2 white 1/2 brown for a warm caramel flavor.
6. Do not try to make other substitutions or additions. Sour cream, cream cheese, fruit purees all do disastrous things.
Chocolate Frosting -

Chocolate Frosting
Recipe adapted by Our Best Bites from Sugar Plum
2/3 cup granulated sugar
1/3 cup all-purpose flour
3 tablespoons unsweetened cocoa powder
1 cup milk
1 cup real butter, softened
1 cup semi-sweet chocolate chips, melted
Optional: Additional cocoa powder as needed
Melt your chocolate chips if you haven't already and set aside to cool. You obviously don't want it so cool that it hardens, but you can get it close to room temperature and still have it be soft and stir-able.
In a small saucepan, whisk together sugar, flour, cocoa, and milk; bring to a boil, whisking frequently. Boil 1-3 minutes or until thickened like a thinned pudding. Remove pan from heat and strain mixture into a small bowl. Cool completely in the refrigerator or freezer.
When chocolate flour mixture is cooled, beat the butter until creamy, about 1 minute. Beat in the cooled chocolate mixture until well combined fluffy, about 1 minute. Finally add in melted chocolate and beat again until well combined and fluffy, about 2 minutes. If desired, add additional cocoa powder to taste, up to 4 tablespoons more. Spread or pipe frosting on to cupcakes or cake.
Makes enough to frost 24 cupcakes.
Storage: Store unused frosting in fridge and bring to room temperature before using again. If needed, beat with an electric beater before using.
Perfect Cupcake Frosting and Filling -
3 T Flour
1/2 C milk (whole milk is best, but I used non-fat when it's all I have and it's actually fine)1/2 C real butter
1/2 C sugar (that's granulated sugar, not powdered sugar)1 t vanilla extract, or other flavor if you wish.
Whisk together the flour and the milk. Heat in a small sauce pan on medium heWhisk continuously until it starts to thicken. Let it cook, while stirring, until you can start to see the bottom of the pan. It should still be liquid-ish though, like this:It's okay if you have lumps, because we're gonna strain those out right now. Place the mixture in a mesh strainer and stir with a rubber spatula to push it through.
Whisk together the flour and the milk. Heat in a small sauce pan on medium he
 Whisk continuously until it starts to thicken. Let it cook, while stirring, until you can start to see the bottom of the pan. It should still be liquid-ish though, like this:
 It's okay if you have lumps, because we're gonna strain those out right now. Place the mixture in a mesh strainer and stir with a rubber spatula to push it through.
You should end up with a nice, smooth mixture. It's almost like pudding before it's set.

Put this mixture in the fridge and let it cool completely, it's fine if it stays in there long enough to get chilly, you just don't want it warm at all. When it is chilled, you can move on to the following step.
It an electric stand mixer, beat the butter and the sugar for a minute or two until well combined and fluffy. You'll want to use the whisk attachment on a stand mixer, not the flat paddle. Then while beating, add in the thickened milk mixture and the vanilla. Beat to combine and then scrape down the sides. Don't be scared. It's going to look like a goopy mess and kind of lumpy and separated like this:

After 7-8 minutes it will have transformed from that sloppy mess into something gorgeous, fluffy, and incredibly light and silky.

Frosts 12 cupcakes
Weight Watchers Points: 1 point per tablespoon of frosting
Here are some helpful Notes:
1. Use real butter, and a good name-brand. Cheap butter does weird things.
2. If you beat for the 6-8 minutes and the mixture still looks strange, beat longer and at a higher speed if you can. It should come together, but it takes a little patience!
3. Store at room temperature. Frosting may separate in the fridge, but you can store it overnight if left at room temp and in a well sealed container.
4. Add extracts to your hearts content; lemon is wonderful! Food coloring is also okay.
5. The white sugar can be exchanged for brown. Try 1/2 white 1/2 brown for a warm caramel flavor.
6. Do not try to make other substitutions or additions. Sour cream, cream cheese, fruit purees all do disastrous things.
Chocolate Frosting -
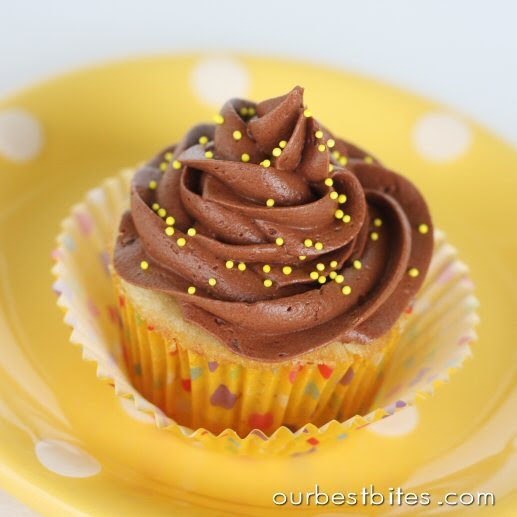
Recipe adapted by Our Best Bites from Sugar Plum
2/3 cup granulated sugar
1/3 cup all-purpose flour
3 tablespoons unsweetened cocoa powder
1 cup milk
1 cup real butter, softened
1 cup semi-sweet chocolate chips, melted
Optional: Additional cocoa powder as needed
Melt your chocolate chips if you haven't already and set aside to cool. You obviously don't want it so cool that it hardens, but you can get it close to room temperature and still have it be soft and stir-able.
In a small saucepan, whisk together sugar, flour, cocoa, and milk; bring to a boil, whisking frequently. Boil 1-3 minutes or until thickened like a thinned pudding. Remove pan from heat and strain mixture into a small bowl. Cool completely in the refrigerator or freezer.
When chocolate flour mixture is cooled, beat the butter until creamy, about 1 minute. Beat in the cooled chocolate mixture until well combined fluffy, about 1 minute. Finally add in melted chocolate and beat again until well combined and fluffy, about 2 minutes. If desired, add additional cocoa powder to taste, up to 4 tablespoons more. Spread or pipe frosting on to cupcakes or cake.
Makes enough to frost 24 cupcakes.
Storage: Store unused frosting in fridge and bring to room temperature before using again. If needed, beat with an electric beater before using.
Monday, October 11, 2010
○YuMmY Caramel Apples○
I LOVE Fall especially the treats...so we made some homemade caramel apples the other night...


Dipped in white chocolate and regular chocolate. Sprinkled with nuts, orange sprinkles and my ABSOLUTE favorite cinnamon sugar!! Other toppings M&M's, crushed Oreo's, chopped candy bars, coconut, marshmallows & nuts (Rocky Road style), toffee, etc.

Our family creations...mmmm!!

I learned this year that GREEN APPLES work the BEST and the tart with the sweet makes them even better!!!!
Easiest Caramel --32 caramels unwrapped
5 Tbl. evaporated milk
Melt caramels and milk in saucepan on low. Cool slightly and dip apples.
Easy Caramel --
1 lb. butter
2 cups sugar
1 tsp. vanilla
1/2 tsp. salt
Cook on medium heat stirring continually, to the hard ball stage with your candy therm. (about 4-5 min). Cool slightly and dip apples.
Creamy Caramel --
1 cup butter
2 cups sugar (white)
1 cup Karo syrup
1 can sweetened condensed milk
Cook first 3 ing. over medium heat to softball stage stirring constantly. Then add can milk and cook to hard ball stage. Pour into buttered dish and cool until ready to use. Do Not put in fridge.
TIPS that I learned --
Place wax paper on cookie sheet, wash & dry Granny Smith apples, and put sticks in them. Roll apples in caramel, wipe bottom quarter and excess with a butter knife, set on cookie sheet. Repeat. Once cookie sheet is full, put in fridge to cool completely before dipping in chocolate/decorating them. Or you can even make them the night before. Roll them in chocolate that is not too hot, then sprinkle immediately in desired toppings. Set back on wax paper and refridgerate. After cooled cut into wedges from the stem (like a pie) and ENJOY!!
AND here is a recipe I found today...
Honey Caramel Apples --
Recipe by Our Best Bites, inspired by Everyday Magazine
4 large (or 6 small) crisp apples, chilled in the fridge for at least 1 hour
1 Cup honey
1 Cup heavy cream
1 pinch salt (about 1/4 teaspoon)
1/2 tsp vanilla extract
In a heavy sauce pan over medium heat, combine cream, honey, and salt. Once warmed and whisked together, bring to a rolling boil. Reduce heat to a simmer (it should still be bubbling, but not so hot that is splatters all over). Stir and scrape sides of pot down occasionally until a candy thermometer (you should all have one by now--they cost about 3 bucks!) reaches 260 degrees.
To reach 260 degrees can take about 30 minutes, so while your caramel is cooking prepare your apples. Wash and dry them and skewer them with a popsicle stick or bamboo skewer. Place in the fridge to continue chilling until ready to use. Also line a baking sheet or cutting board with waxed paper or parchment paper and set aside.
When caramel has reached 260 degrees, remove from heat and let sit for 5 minutes, stirring occasionally. It should start thickening. You'll have to eyeball the consistency for dipping. If you'd like to help it along you can place your pot in a bowl of ice. And if it gets too hard to coat the apples, just return it to the heat until it's thin again.
Remove apples from fridge and dry them thoroughly with a towel. Dip in caramel, rolling and twirling each one so it gets well coated. Let excess drip off and then place on prepared sheet. Refrigerate for 10-20 minutes to set the caramel and then enjoy!
Thursday, March 18, 2010
(Somewhere Over the RaInBoW)


To help celebrate St. Patrick's Day we made festive RAINBOW cupcakes!
YUMMY!!
I have been seeing them around on other blogs and have been dying to try them out myself. Even though they are a very LoOoOoNg process I LOVED the way they turned out! I found a wonderful recipe to make your cake box mix taste good too. We topped them with a delicious marshmallow frosting which gave it a fun cloudy look:) And they tasted DE•LI•CIOUS!!!!!!!!!!
RAINBOW CUPCAKES:
1 white cake mix
1 sm. pkg instant pudding - vanilla
(Tip -- you can use same recipe for any cake mix, just use chocolate pudding for chocolate cake)
8 oz. sour cream
4 eggs
1/2 c. water
1/2 c. oil
First mix together cake mix with pudding, then add remaining ingredients and beat well.
Seperate batter evenly into 6 different bowls and add food coloring to get desired colors. I just mixed till I got it bold enough....
Today I found this guideline or someone even suggested using gel dyes and it creates more vibrant colors ....
RAINBOW COLOR DROPS OF FOOD COLORING --
Purple 9 red and 6 blue drops
Blue 12 drops
Green 12 drops
Yellow 12 drops
Orange 12 yellow and 4 red drops
Red 18 drops
Than place about 1 tsp of each color batter into cupcake liners to fill 1/2 - 3/4 full. I even saw someone do layers, which was just as cute:) Bake 350* for 15 minutes. Frost when cooled.
MARSHMALLOW FROSTING:
1 lb. butter - softened
2 jars marshmallow creme
1 lb. powdered sugar
2 tsp. vanilla
Beat all ingredients till fluffy! I then put the frosting in a ziploc baggy, cut the tip and swirled frosting onto the cupcakes. I would have used my frosting bag but I don't have a tip big enough, but the baggie worked just as good!
Here is another frosting recipe if you don't prefer marshmallow:)
COOL WHIP FROSTING:
2 sticks butter (1 cup) - softened
3/4 bag powdered sugar
1 tsp. vanilla
Mix together and slowly add milk to get desired thickness. She adds about TBL at a time. Than fold in a tub of Cool Whip. I haven't tried this one so let me know if you do and I need to tweak the recipe!
♣HAPPY ST. PATRICK'S DAY♣
Another fun festive RAINBOW treat is fresh fruit served with YUMMY fruit dip --

My kids and husband devoured this creative snack and really thought it was fun. Here is my fruit dip:
MARSHMALLOW FRUIT DIP:
1 8 oz. cream cheese - softened
1 jar marshmallow fluff
2 tsp. vanilla
Beat till creamy and fluffy. Chill. Serve with favorite fruit!
I came across this idea on another blog and she included fruit ideas and another version of fruit dip --
Red - Strawberries, apples, cherries, watermelon
Orange - Mandarin oranges, navel oranges, canteloupe
Yellow - Pineapple, banana, apples, pears, lemons
Green - Apples, pears, grapes, limes
Blue - Blueberries
Violet (Purple) - Plums, grapes, pears
Pot of Gold - Bananas
Clouds - Sm. Marshmallows
Pot of Gold - Bananas
Clouds - Sm. Marshmallows
(I cut the apples and bananas over two hours before I served it and they weren't brown. How? Using a basting brush, spread lemon juice over the cut sides. EASY!!!)
FRUIT DIP:
8 oz. Cream Cheese (softened works best)
8 oz. Cream Cheese (softened works best)
8 oz. Sour Cream
3/4 cup brown sugar
3 oz. package of instant vanilla pudding
1 teaspoon vanilla
Mix it all together. Chill in the fridge until you are ready to serve. And DEVOUR!!
Tuesday, February 23, 2010
^High Altitude Baking^
Since we recently moved I have been having a hard time with getting my favorite Oatmeal Chocolate Chip Cookies to turn out:( They are flat and hard! My mom suggested it is from my change in altitude. So I was excited when I came across a tip from Bakerella to check out this website....
I am around 5600 ft so I am definitely going to try adjusting this recipe and see if it helps. Like she says, try out the original recipe first cause it may just work and if not then make adjustments. My mom is at about 7000 ft so this will help her cookies as well...shhh don't tell her but her cookies are always flat!;) Hope this helps some of you and a recipe that never turns out quite right!!
*Cake Mix Tips*
I LOVE using cake mixes from a box...especially for my cake pops! But I am not a fan of how sometimes they just don't taste moist or as good as homemade. So I got excited when I found this tip on a blog (sorry don't remember where I found it).
'I make wedding and other celebration cakes that people rave about and they all come from a box. My best secret is 1/4 - 1/2 cup of sour cream mixed in at the end of chocolate, yellow or other dense cake mixes for the moistest treat ever.
You can also throw in a small tub of any flavored yogurt with your white cakes, yellow cakes, butter cakes.
For filling or frosting try the same flavor of yogurt with cool whip or fresh whipped cream and a stabalizer. Add a layer of fresh fruit, another layer of pie filling or glaze = yummo.
Also if you think of ANY candy bar you love, you can't go wrong. Throw them in, layer them in or dissect the little guy to figure out its bits and peices and turn your cupcake into its little clone. Caramel, truffle or peanut butter centers, crispy chocolate, gnachey outsides. The world is yours!!!
I have personally been on a year long fast from sugar. Can you tell? I still bake it all for others and love to encourage them to enjoy so I can live vicariously:)'
Tuesday, September 8, 2009
Good Ole Family Fun...
This weekend I got together with my wonderful cousins and we mixed, rolled, froze, dipped and drizzled till our hearts were content:) We tried some old and some new recipes for making cake pops/balls and I wanted to share them...
Here is the links to my other Cake Pop adventures--
Basic Cake Pops
Cheesecake Balls
Bakerella's Blog for further instructions and ideas - gotta give credit where credit is deserved:)
Over the past few months I have worked out a lot of my kinks and perfected my dipping methods. So here is a few tricks I have had up my sleeve that will make this process a little easier:
-Really pay attention to the type of chocolate you use. I have found that Kroger is the best and Western Family brand would be my second choice. DO NOT use gourmet chocolates...tastes the best but doesn't set up.
-Double check the boxed brownies you purchase...the more oil it calls for the greasier they will be and harder to keep shape. I actually prefer the WF brand as well. Plus start out with 1/4-1/2 of the 8oz. of cream cheese.
-Now my dipping technique...I will explain and than post pics next time I do this (sorry I keep forgetting to take them). If you are not putting them on sticks like in my basic instructions than put the balls in freezer till firm, almost frozen. My freezer will set them up in about 30 minutes. Than insert a toothpick into the flat part of the ball and dip in chocolate a little more than 3/4 of the ball up to the toothpick (do not cover whole ball). Tap excess off and twirl and tap to smooth. Place in foam block to set up. The faster you dip the less chance they will thaw out. If they start to fall off toothpicks place back in freezer to set up.
After they have hardened on foam block remove from toothpick and dip bottom of the ball into more chocolate and place on wax paper to set up. Then drizzle with more chocolate. Of course you can indulge yourself with a taste or wrap in bags, tie a pretty bow and share. Enjoy!!
I apologize if it's confusing I will get some photos up!!:)
-Another trick I learned was BUY some bottles at your local craft store that have a tip on them for drizzling. I usually would just use a baggie with the end cut off till I discovered using these this weekend. They were $2 for 2 of them (found in the baking section at my Micheal's) and I use one for chocolate and one for vanilla. They are a great investment.
If you have any questions please don't hesitate to ask:)
Here is a new recipe we tried and some I plan on doing...
Cookie Dough Truffles --
3/4 c. Brown Sugar
1 Stick Butter
2 c. Flour
1 tsp. Vanilla
1 can Sweetened Condensed Milk
1/2 c. Mini Chocolate Chips
Cream together the sugar and butter. Then add flour, vanilla, milk, and choco chips. Place in fridge for 1/2 hour. Roll into balls, place on wax paper and firm up for another 1/2 hour. Than dip into melted chocolate. Enjoy:) The kids all LOVED these!!
These two I plan to try...
Blonde Brownies --
2/3 c. Melted Butter
2 c. Brown Sugar
2 lg Eggs
1 1/2 Tb Water
2 tsp. Baking Powder
1 tsp. Vanilla
1 tsp. Salt
2 3/4 Flour
2 c. Chocolate Chips
Mix first 7 ingredients, then add flour. Blend together. Add chocolate chips and stir. Spread in 9x13 pan. Bake 340* for 2-24 minutes. Or until edges start to brown. Cool completely.
Chocolate Chip Peanut Butter Blondies --
1 cup margarine
2 cups white sugar
2 eggs
1 teaspoon vanilla extract
1 cup chunky peanut butter
2 cups all-purpose flour
1 teaspoon baking powder
2 cups semisweet chocolate chips
Preheat oven to 350 degrees F (175 degrees C). Line a 10x15 inch jellyroll pan with parchment paper.
In a medium bowl, cream together the margarine and sugar. Beat in the eggs, one at a time. Stir in the vanilla and peanut butter until smooth. Combine the flour and baking powder, then stir into the peanut butter mixture. Finally, fold in the chocolate chips. Spread the dough out flat on the prepared pan.
Bake for 12 to 15 minutes in the preheated oven, until the tops of the bars look dry. Cool completely in pan.
To make the balls I would mix with chocolate frosting. And roll as instructed. I will play with these recipes and let you know how they turn out:)
Monday, May 18, 2009
Are Those Eggs Still Good To Use?
I found this on Tip Junkie today and thought I would share. I am always wondering if my out dated eggs are still good to eat or cook with.
Ever have an egg in your fridge and you were not sure if it was still good or not? There is an EASY way to find out. As eggs go bad, gases are produced inside the egg. As those gases are produced, the egg becomes more and more buoyant.
Here’s what you do!
Fill a glass with water, place your egg inside.
If the egg sinks to the bottom, it is still good and will be for some time.
If the egg floats to the middle of the glass, it is still good but needs to be used soon.
If the egg floats all the way to the top, you need to throw it away.
I swear knowing this is going to really impress someone at some point in your life.
Sunday, May 10, 2009
++10 meals in 1 hour++
 This week has been CRAZY!! But I found some great deals on meat and decided to do some freezer cooking. I purchased about 18 lbs. of chicken, 7 lbs. of hamburger and freezer bags.
I placed all but 7 chicken breasts in the crock pot and cooked on high for about 4 hours. After the chicken was cooked and cooled I spent about a half hour cutting, cubing, bagging and labeling the chicken. I than cooked half of the hamburger meat with a little dried onion, made patty's with the other half, bagged it and labeled it all. It took me less than an hour and about $25 for all the meals. Here is what I now have in my freezer:
1. - 2 chicken breasts marinated for grilling
2. - 1.5 lbs. cooked hamburger - Taco's
3. - 1.5 lbs. cooked hamburger - Mexican Manicotti
4. - 5 raw chicken breasts mixed with ingredients for Creamy Italian Crock-pot Chicken (see older post for recipe)
5 & 6. - 8 hamburger patties - stacked on wax paper ready for grilling
7. - cooked and cubed chicken - Chicken Enchilada's
8. - cooked and shredded chicken - Haystacks
9. - cooked and shredded chicken mixed with taco seasoning - Chicken Quesadilla's
10. - cooked and cubed chicken - Chicken Spaghetti
Tuesday, April 7, 2009
How to Soften Butter in a Jiffy...
I found this nifty little trick over on Be Different Act Normal's blog and wanted to share. I always wondered why my cookies end up flat? Now I know it's because I get in a hurry and melt my butter in the microwave and than cream the sugar with it. She suggests...
"You put the butter in between to sheets of wax paper and roll it flat like you would a pie crust. You then peel it off the wax paper and put it in the bowl to cream. For the best results, you have to have softened butter. Creaming the butter and the sugar is actually a really important step. You want the sugar to be able to punch a million little holes into the butter. These air pockets help the cookie rise and make them light. Her obsession with Good Eats is where she got that lovely piece of information and it has served her well."
Monday, November 24, 2008
My Grocery Game Plan....
I thought I would share with everyone my game plan for grocery shopping and hopefully give you some helpful tips. Each month I start out with a set amount per pay check for our groceries - We get paid twice a month and I allow more for one shopping trip than the other to accomidate for other things - i.e. shampoo, cleaning products, etc. So I go shopping usually a few days after our pay days. The day before I sit down with my little calander (I have one my mom gave me that has days down the left and columns on the right - 4 boxes for each day of the week). I have only found these at a store in Farmington and I don't know who sells them - sorry. But any calander would do. I write down a meal plan - what's for breakfast, lunch, snacks, dinner for each day up until the next pay day. I also include on each day if we will be out of town or other appts., usually in the 4th column. So when I go to make my grocery list I will only write down what I need, it really helps with impulse buying as I go down each aisle. I don't always stick to the order of the menu but I always know I have those things on hand for that particular meal. Than comes the list. I have been typing up my lists lately cause it helps me have more room. Plus I have been using coupons and this way I can write details on what brand I have to buy and deals that are available. I usually write a C after that product so I know it has a coupon. Than I check to see in store deals and make a note next to each item where is the best deal and price so I can price match at Wal-mart. I will than include things on my list that I know are great deals to add to my food storage and this way helps me save next time on my budget.
My sister-in-law found a great website called www.grocerygame.com that does all the brunt work for bargain shopping. They compile a list of in-store deals plus coupons to save you lots of money at certain stores. The two that I have found in my area are Smith's and Albertson's (Ogden). You can join for a few weeks for only $1 so I suggest you try it out. She has saved tremendously. Alot of the deals are great for stock piling and they tell you what is good for now and what is good for food storage. I have tried it a few times but it really hasn't worked quite as well for me yet. Mainly because when I come into town it's not as easily for me to run to 3-4different stores for all that I need. I have to bulk shop enough for 2-3 weeks. I believe it would work if I was able to go shopping once a week - they publish the deals only from Sunday to Tuesday and I am not always able to go shopping on those days. I have learned to use coupons and do my own homework for what I need, plus Wal-mart will price match all competators adds. I don't get the adds though and so I still use this site to check out in-store deals. Another helpful tip - I have been shopping in Evanston because there is no food tax in Wyoming. This may not work for all of you because it is quite the drive but if you are ever that way it's good to know and helps you save a little bit.
It sounds like a lot of work to go grocery shopping but I feel that it has saved my family alot. I feel so silly handing the cashier my stack of coupons and correcting her for each price match but I walked away last trip saving myself $75 dollars and a overflowing cart of groceries for under $200 dollars. This not only included food but our personal necessities as well for 2 1/2 weeks. If any one has any questions or would like to see details (lists and menu's) of my grocery game plan please feel free to contact me. I love sharing money saving ideas with family and friends cause we can all use a little help during these challenging financial times. I hope I included something that helps you the next time you shop. Luv ya all....
Subscribe to:
Posts (Atom)


